
In an earlier post I outlined how to get queries to ignore collation. In a future mini post I will show how to change a database's collation.
Today's focus is the instance's collation.
Changing the collation of a SQL Instance is not something to be taken lightly (which is why it's good practtice to choose the correct collation the first time you set up the instance). In order to change it you have (as far as I know) two options:
- Reinstall the instance.
- Rebuild The System Databases.
So without further ado, let's look at the second option.
The majority of today's posts come from instructions found here on the official MSDN blog. We are going to use those instructions with a view to specifically changing the instance collation.
First off, let's verify the instance's collation.
1) Verify Instance Collation
Via Management Studio:
- Open Management Studio, connect to your instance, right click the instance name and select properties.
- Under "Server Collation" you'll see the collation that was chosen when SQL Server was installed (In this example it is "Latin1_General_CI_AS".
 |
| Fig. 1: Checking the instance properties to see the Collation |
Via TSQL
- Run the following in a new query window:
SELECT CONVERT (varchar, SERVERPROPERTY('collation'));
2) Detach all USER Databases
This is the tedious part if you have a lot of user DBs.
- I would suggest backing up each DB first.
- To detach a database, right click a database, select Tasks -> Detach.
- In the detach window, select the "Drop Connections" checkbox.
- Repeat the above step for each user DB.
3) Run SQL Server Setup.exe
- First verify Setup.exe exist by browsing to C:\Program Files\Microsoft SQL Server\100\Setup Bootstrap\Release.
- Next open command prompt.
- Browse to Setup.exe's loctation via the cmd prompt using the following command: "cd C:\Program Files\Microsoft SQL Server\100\Setup Bootstrap\Release" (don't put the quotes).
- Run the following in cmd prompt:
Please view this link again to get a different view on how to fill in the above, and view this link for a detailed explaination for what is required after each '=' above.
Notes: When listing your SysAdmin accounts, please seperate each account name by a space and place your account names in double quotes.
Leave the query to run for a few minutes. It will return to the normal promt when its finished. If any errors were encountered, they will be displayed in the command promt and you'll have to rerun the cmd after you've made your fixes to the command.
 |
| Fig. 2: The Setup command in command prompt after it ran successfully. |
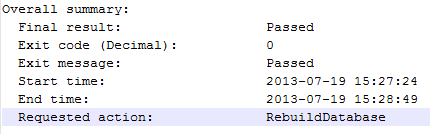
To view if the command executed 100% correctly, check the Summary.txt file found at "C:\Program Files\Microsoft SQL Server\100\Setup Bootstrap\Log".
You should see something like the below.
4) Verify Collation Change
Re run the sub-steps outlined in Step 1.
5) Reattach User Databases
Right click the databases folder in Management Studio and select "Attach...".
Choose your database mdf file and click "Add".
And that is that. Any collation issue you had before should now be gone.
Related Posts:
Change SQL Instance Collation
Change Database Collation
Change Column Collation
Adjust Queries to ignore Collation
DISCLAIMER: As stated, I’m not an expert so please, PLEASE feel free to politely correct or comment as you see fit. Your feedback is always welcomed. :-)
No comments:
Post a Comment